|
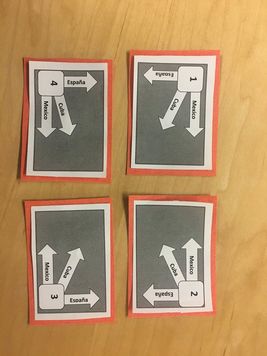
Doesn't the title of this blog post sound fun to read? I was asked on Facebook to share a little bit about some of the ways I group kids in my class, so I thought I'd write a brief blog post about the student seating organization system I use. First, I put the kids in groups of four. My classroom has desks, but this could be done with tables too. My desks are in rows, but each desk in the group of 4 has a desk tag on it of the same color. See the picture below. In the example above, that would be the yellow group, or grupo amarillo. I have roughly 28 kids in each class, so I would have 7 groups of 4, each group with a different color. The desk tags provide me with a large number of options for grouping kids: 1. Each group of four has 3 different partner possibilities. Mexico partners (person right next to you), Cuba partners (person diagonal from you), and España partners (person in front or back of you). This is great for quick partner speaking activities, etc. 2. If you need students to work in a group of 4, obviously those are set-up for you with the colored groups. 3. If you notice on the desk tags, each student also has a number, 1, 2, 3, and 4. If you need to make 4 groups of students, you have 1s, 2s, 3s, and 4s. How can I use this system for differentiating instruction? Okay, so this admittedly takes some time to set-up and think through when you make your seating chart. It also takes a little assessment and getting to know your students! It also depends on what type of cooperative learning activities you are familiar with. (see more on this below) However, the possibilities here are endless. Here are some strategies I have used before. 1. Organize your students so that the "1s" and "2s" in each group are strong students or heritage speakers, and the "3s" and "4s" are struggling learners. Then, choose which partner groups you use based on if you want to have a strong student work with a struggling student, or have the two struggling students grouped together. Of course if you think the students are catching on to this, you could have the 3s and 4s next seating arrangement be the strong students. This also allows for you to easily make groups for station work, etc. where maybe all of the "1s" do something more challenging, while you work with the "4"s on remediation. I highly recommend this sort of organization as it provides you a lot of different options as a teacher. 2. Put students in their color groups based on ability. This is pretty straight forward, but for a change of pace from above, you could put struggling learners in certain color groups, and high-level learners in other groups. It takes away the ability to have higher level learners working with struggling learners for partner work, but does allow you to know exactly which groups you need to provide more attention to, and which groups you may need to find ways to challenge. Specifically, what are some cooperative learning activities that you could use within this organization system? First, I encourage you to think of any sort of group or pair work you have ever done with your class. How could having students grouped in the ways I've described above help add to what you have done? How might you change the activity, or change your role in the activity knowing that you know exactly where your high-level students and struggling students are in the classroom, and who they are paired with? Second, I encourage you to look into Kagan Cooperative Learning. Check it out a brief summary of it here. I am by no means an expert at this, but the "Essential 5" Kagan cooperative strategies are a great place to start! For example, The "Rally Coach" gives the higher-level learner a challenge, while guiding the struggling learner through remediation. Feel free to download the word doc I use to create my desk tags below! Although I love the actual tags on the desks, I will say they were a pain to make, and keep on the desk! It involves laminating, then contact paper or some other way to adhere them to the desk so that students don't pick them off. Here is a whole teacher forum on that topic! This year, I actually took permanent marker (don't tell my custodian), and wrote a number on the back of each desk, 1, 2, 3, or 4. Each group of 4 had a different color I used. Then, instead of using desk tags, I just put a partner organization paper on each wall of the room. This has worked okay so far this year and was a lot less time consuming to set-up!
What ideas do you have for grouping and cooperative learning? Comment below!
1 Comment
|
About Señor Ashby:I am a K-12 Spanish educator specializing in creativity. I am passionate about learning through technology, music, and innovation. I have taught Spanish to K-12, and am a two time finalist for online teacher of the year.l live in West Michigan with my wife and our four energetic boys! Archives
June 2024
|


 RSS Feed